Write the SWMS once, and know who has signed on to it.

Write your Safe Work Method Statements in the app and publish them as numbered versions. Put them on jobs, and each person signs on by typing their name, on a phone with or without signal. Start and finish checklists and ute checks sit alongside, so the records are in one place.

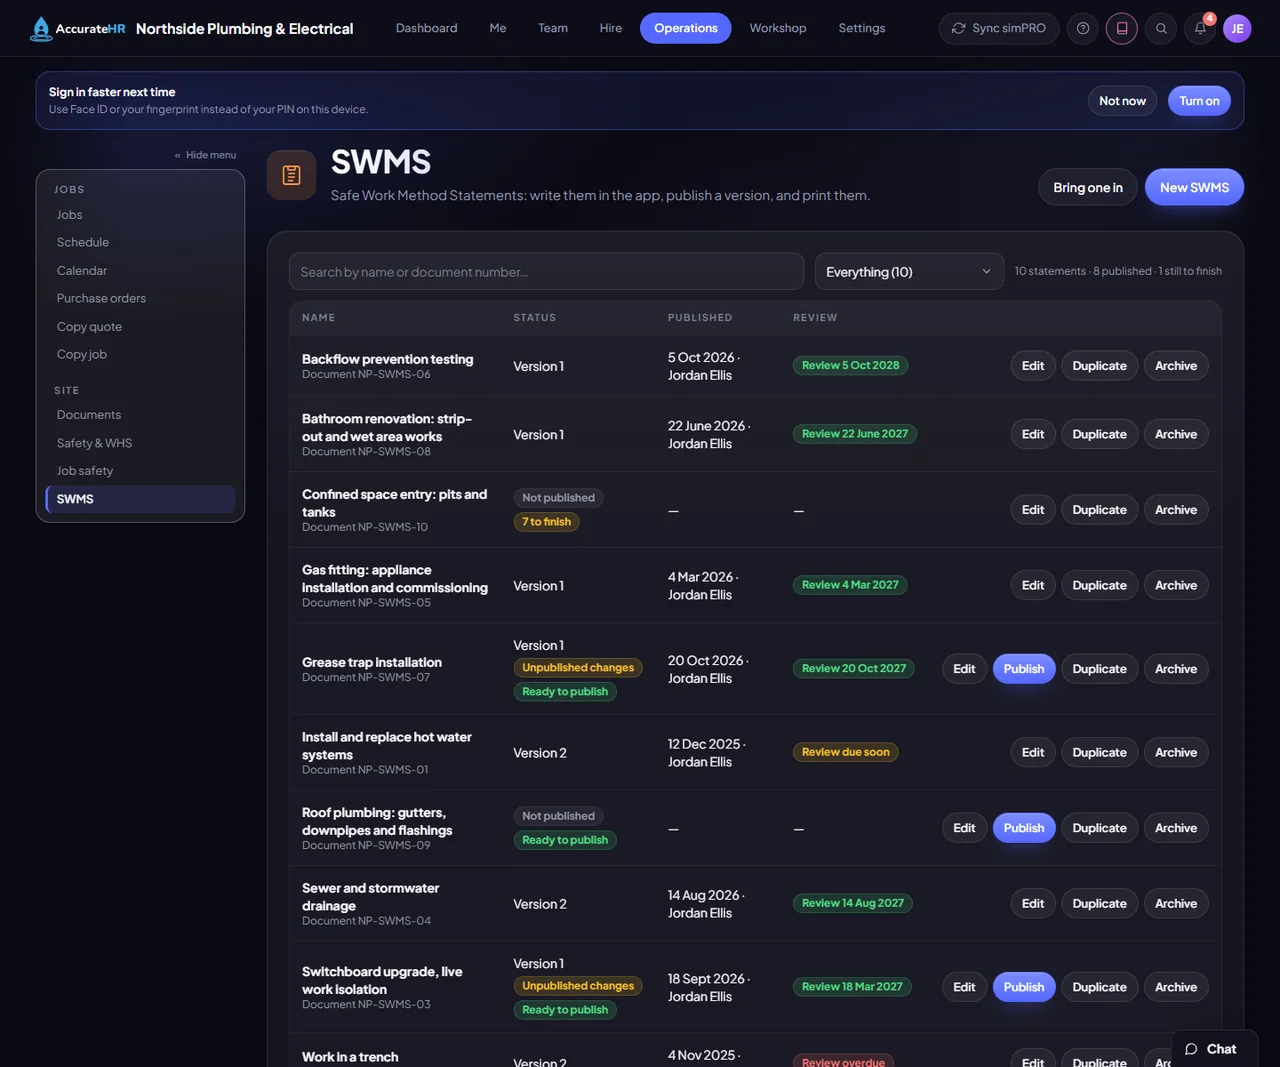
The SWMS library: ten statements, some published, some drafts, two with changes not yet published, and reviews due or overdue
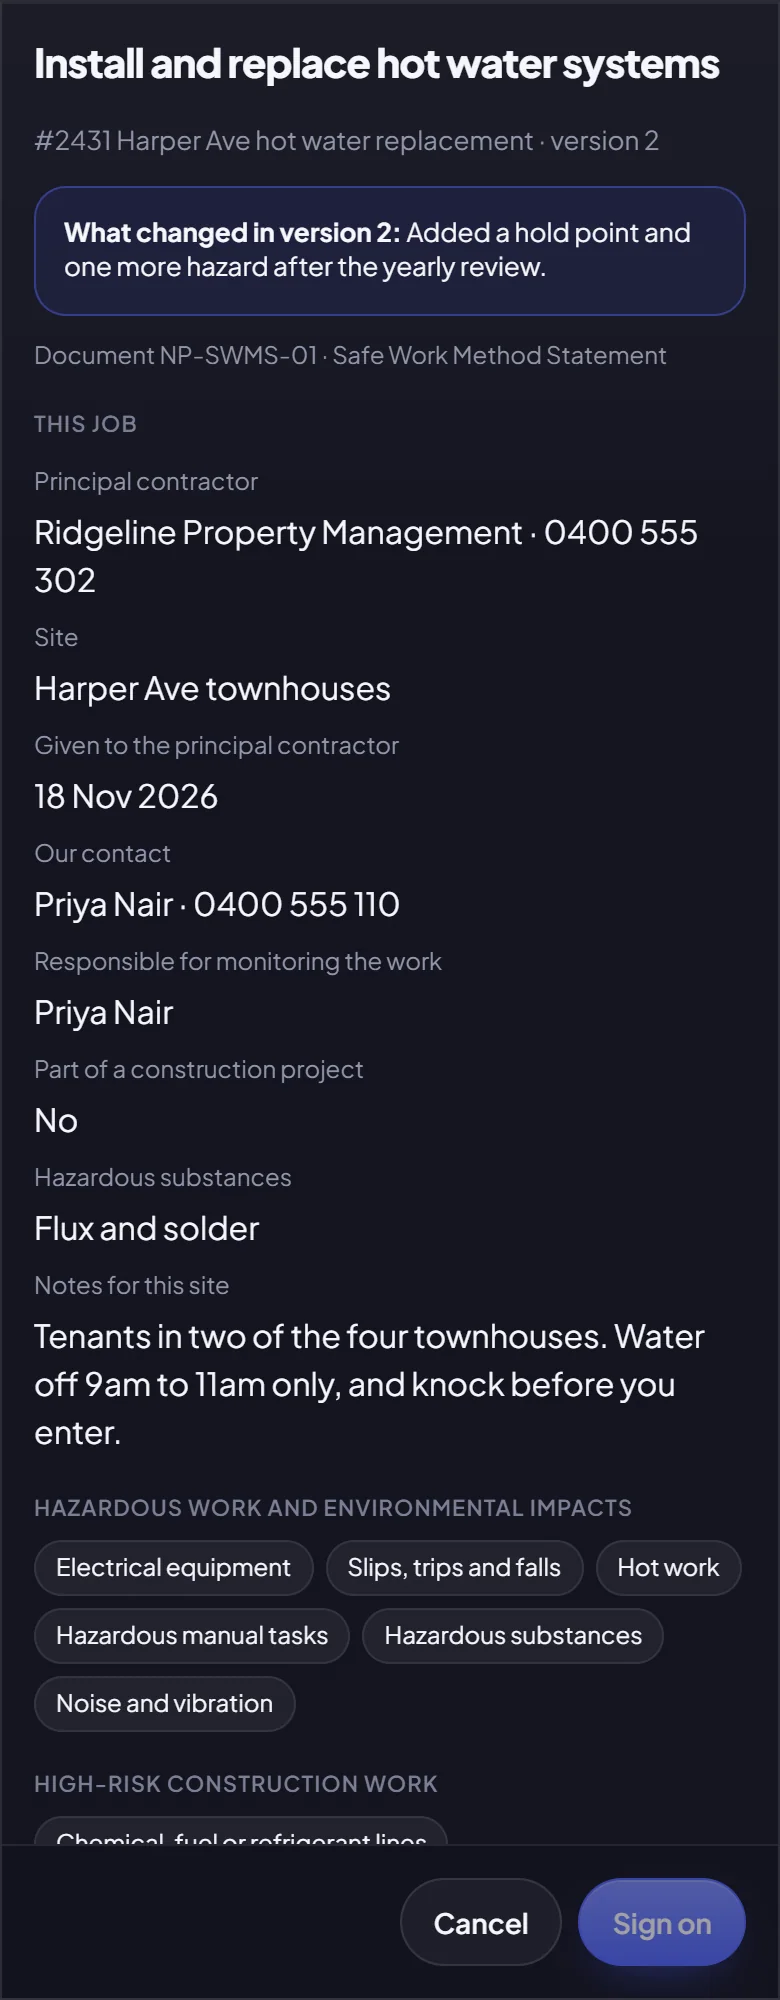
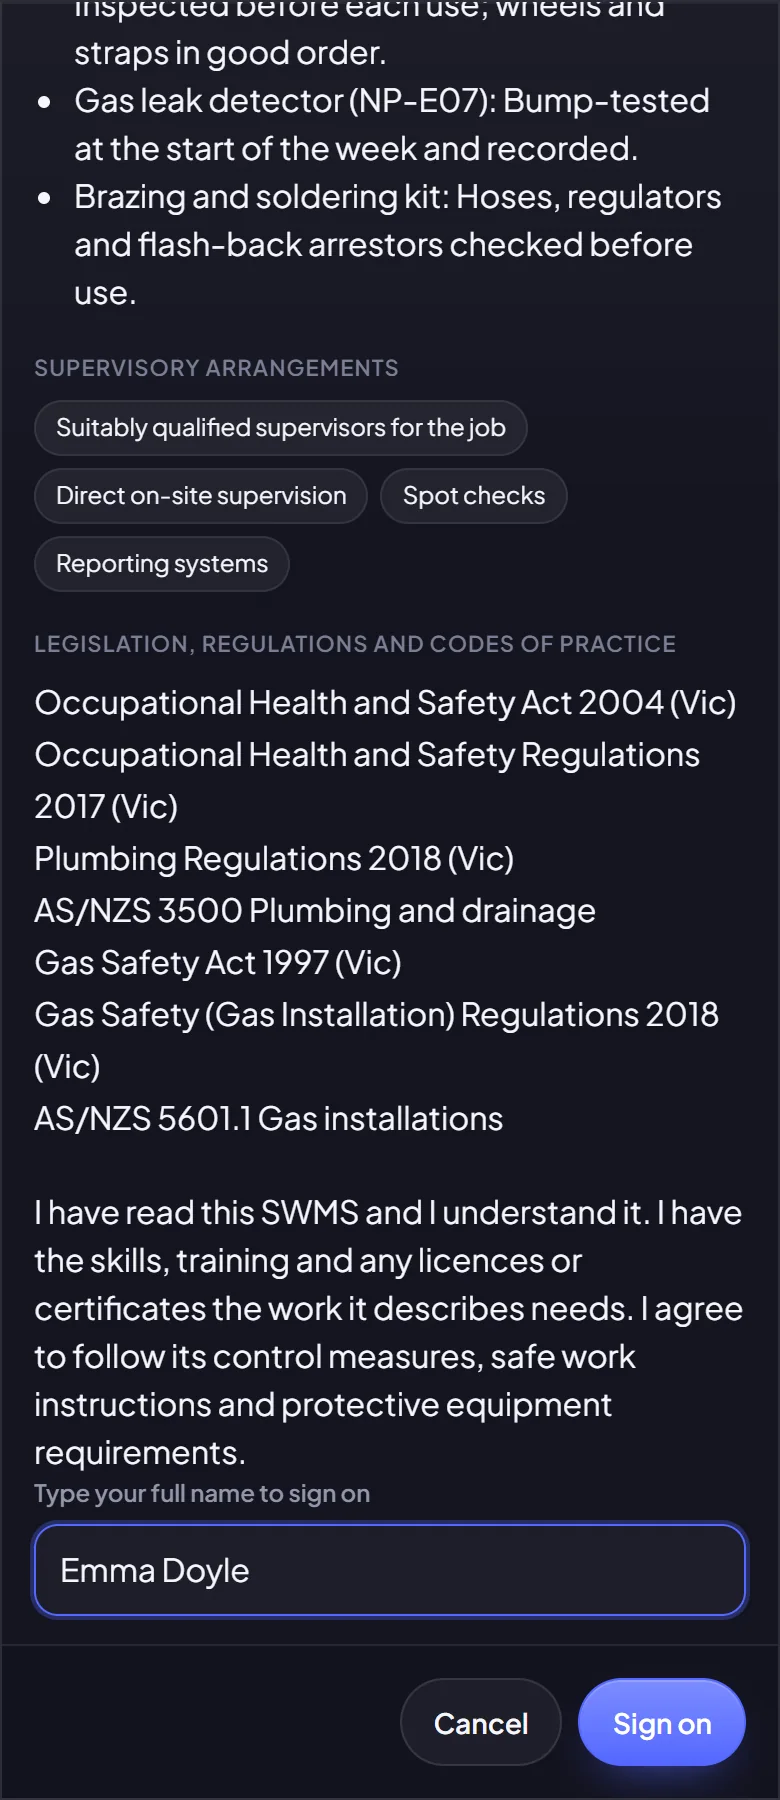
Signing on to a SWMS on a phone: the sentence being agreed to, a name typed, and the Sign on button
The SWMS library: ten statements, some published, some drafts, two with changes not yet published, and reviews due or overdue. A screen from the app, showing made-up sample data.

Writing and publishing a SWMS

Write a Safe Work Method Statement once for a kind of work, check how it will print, and publish it as a numbered version that cannot be changed, with a review date.

  • An editor built for long statements. A bar stays on screen with Save, Preview and Publish, and says how many things are still to finish, each one taking you to the box that needs filling. Each job task folds to a single line until you open it.
  • Hazards rated before and after. Each job task has its hazards, a risk rating before and after the controls, the control measures and who is responsible. The ratings are Low, Moderate, High or Acute, and the app never rates a hazard for you.
  • Bold, bullets and tables. Control measures, the management lists and the legislation note take bold, bullets inside bullets and tables. Pasting from Word, a web page or a PDF keeps the bullets, bold and tables and drops the rest.
  • Copy and bring in. Copy the tasks every statement shares, such as emergency response, from another statement. A statement written in Word can be brought in from the file or pasted text, with any rating it does not give left blank for you to set.
  • Frozen, numbered versions. Publishing makes a numbered version that cannot be changed, with a review date set from the period you choose: 3, 6, 12, 24 or 36 months. A statement can only be published when it is complete: a title, at least one job task, and every hazard with its controls and both ratings. A hazard still rated Acute after its controls, or worse after than before, also blocks it.
  • Print, compare and review. It prints as a landscape page like a paper statement, with a sign-off sheet. Compare lists what changed from the last version, and on a Monday afternoon the people who can publish are told which statements are due for review.
Good to know

Your company writes its own statements in the app, and the legislation note is yours to fill in, so it names your own regulator. Writing is for people whose access level has Can write and attach, and publishing needs Can publish SWMS: to start with, only owners and admins hold them. A job task holds up to 20 hazards, and a statement up to 40 tasks.
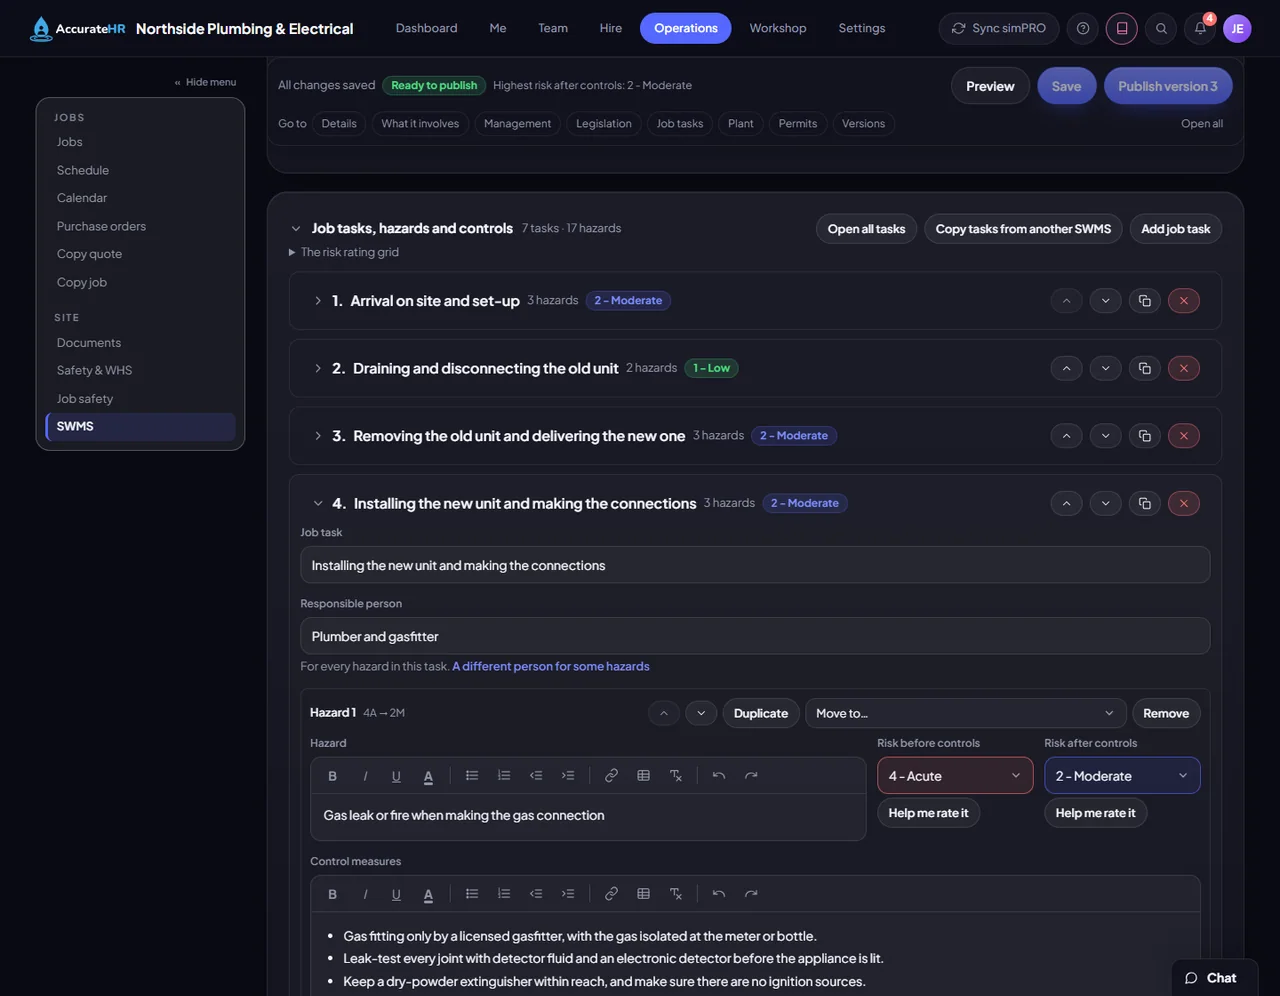
A SWMS open in the editor: job tasks one to a row, one task open with a hazard, its risk before and after, and its control measures
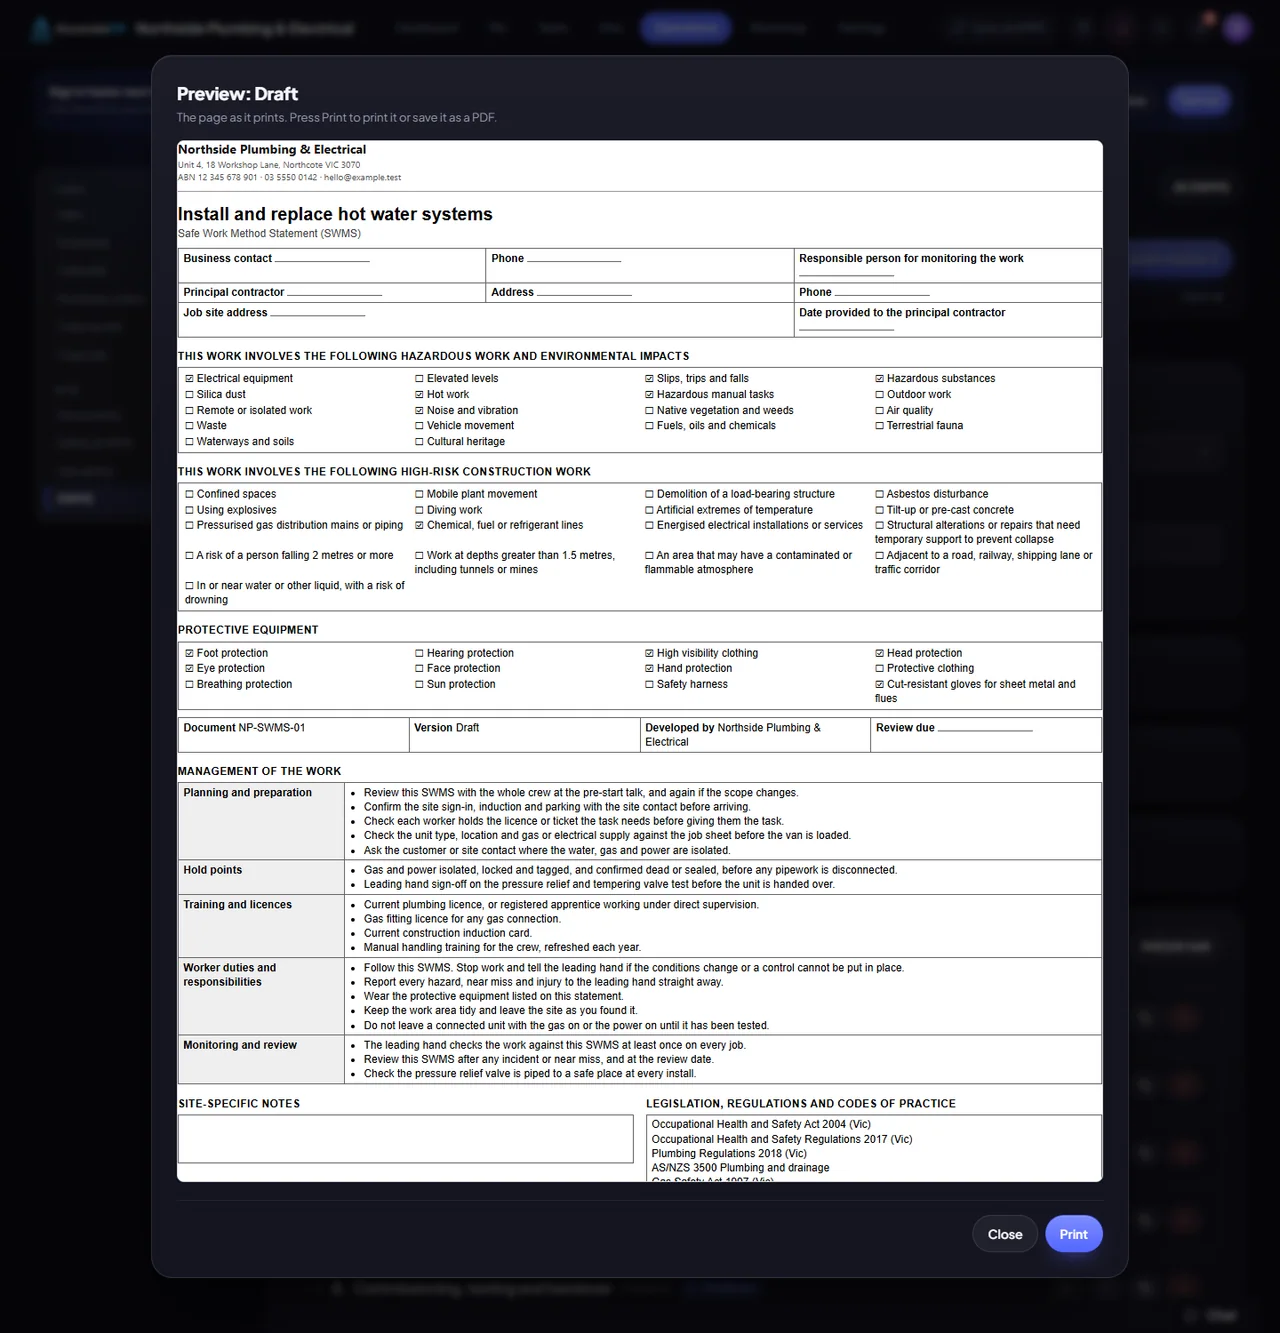
The SWMS as it prints: letterhead, the ticks for the hazardous work and protective equipment, and the management lists
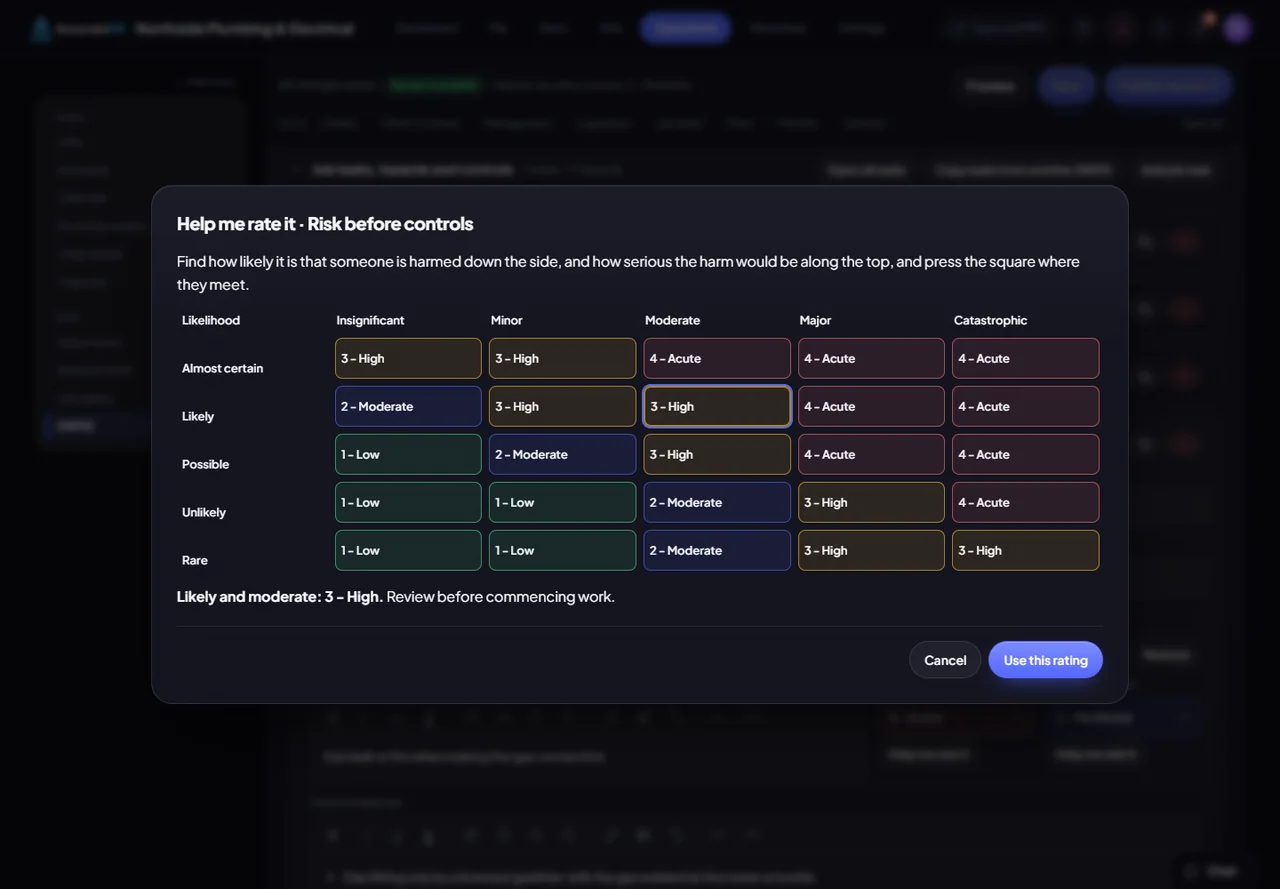
Help me rate it: the risk grid, with a square chosen and what that rating means
A SWMS open in the editor: job tasks one to a row, one task open with a hazard, its risk before and after, and its control measures.

Statements on jobs

Put published statements on a job, enter the job’s details once, and send a statement to the principal contractor.

  • A folder for each job. Each job has a folder for its statements, so the list stays short however many jobs there are. Only a published statement can go on a job.
  • Several at a time. Tick every statement that applies in one list and add them all at once. Each goes on at the version in force.
  • Job details entered once. The principal contractor, the site and the hazardous substances taken on site are entered once for every statement in the folder, and print in each one’s header and lists. A statement can change them for itself, and is then marked Own details for this job.
  • Send it to the principal contractor. Type their email address and the version in force goes to them as a link that works for 30 days, with no sign-in. They can print it or save it as a PDF, and the date given to the principal contractor fills in by itself.
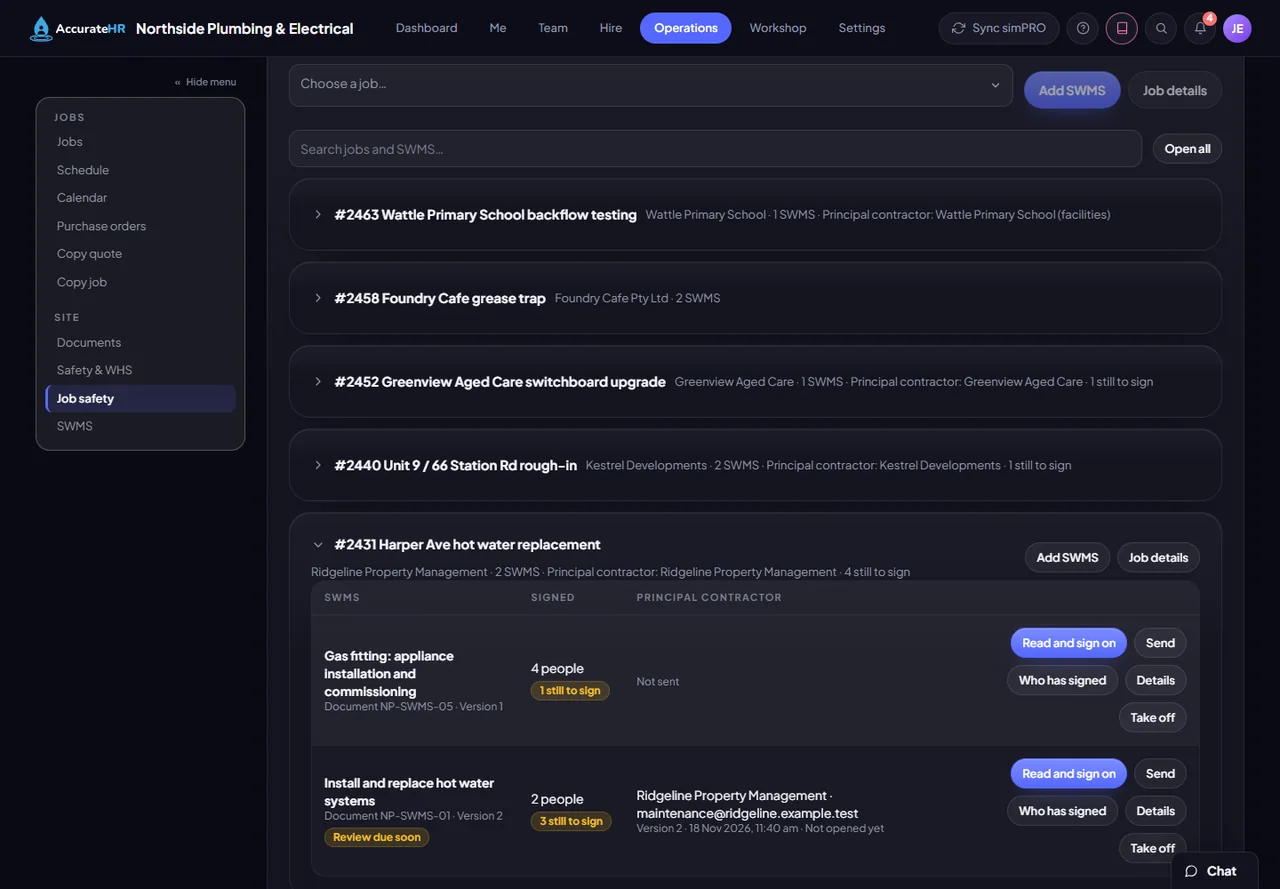
  • See what was sent. The row shows who it went to, which version and whether they have opened it, and flags a newer version that has not been sent. A link you no longer want can be withdrawn at once.
Good to know

Statements can only go on jobs that have been read from simPRO, which is being prepared for customers, and only once they are published. Putting them on jobs, changing a job’s details and sending are all Can write and attach, which owners and admins hold to start with. The Opened mark is a guide, not proof that someone read it, because some email programs open a link to check it. A company can send 50 a day.

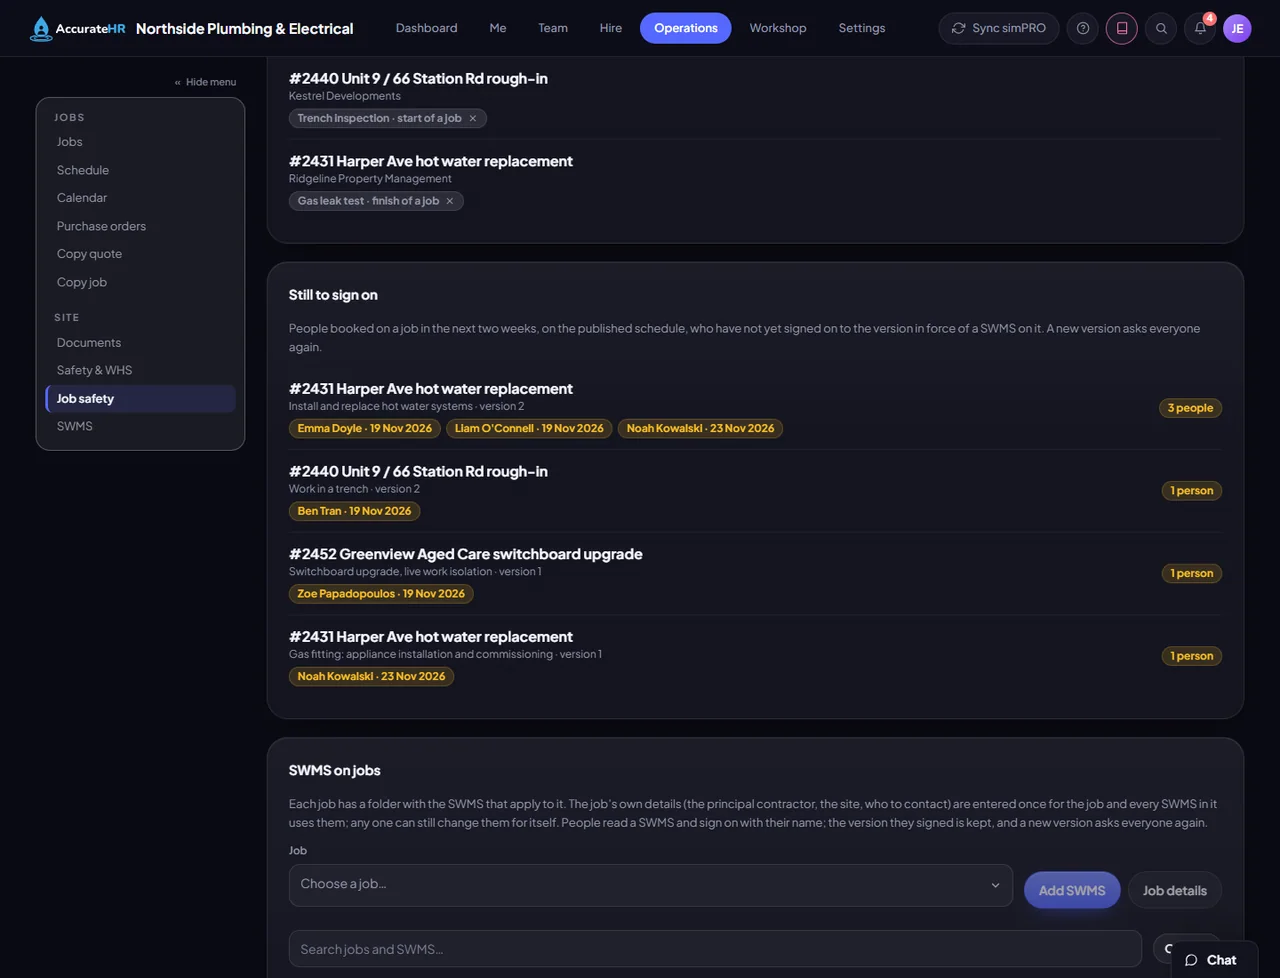
Job safety: who is booked on a job and still to sign on to its SWMS, and the SWMS on each job
A job’s folder of SWMS: how many have signed each one, how many are still to sign, and what has been sent to the principal contractor
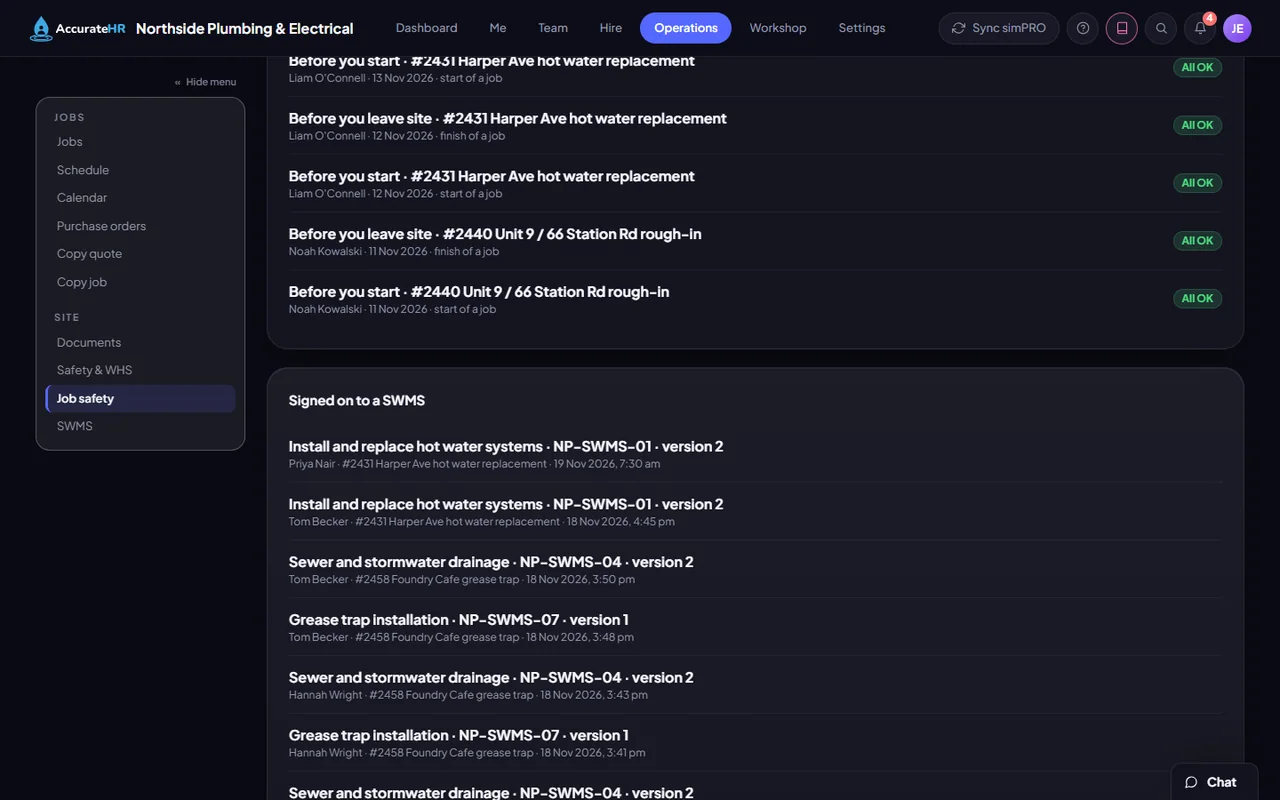
Who has signed on to which SWMS, with the date and time, below the older ticked checklists
Job safety: who is booked on a job and still to sign on to its SWMS, and the SWMS on each job.

Signing on

Each person reads the statement for the job and signs on by typing their own name, on a phone or at the office. The office sees who is still to sign.

  • You type your own name. Signing on is always you, typing your own name: nobody can sign on for someone else. You sign each version once on each job.
  • Kept as you agreed it. Your sign-on is kept with the words you agreed to and the time, and is never deleted. Take the statement off the job and everyone’s sign-ons stay.
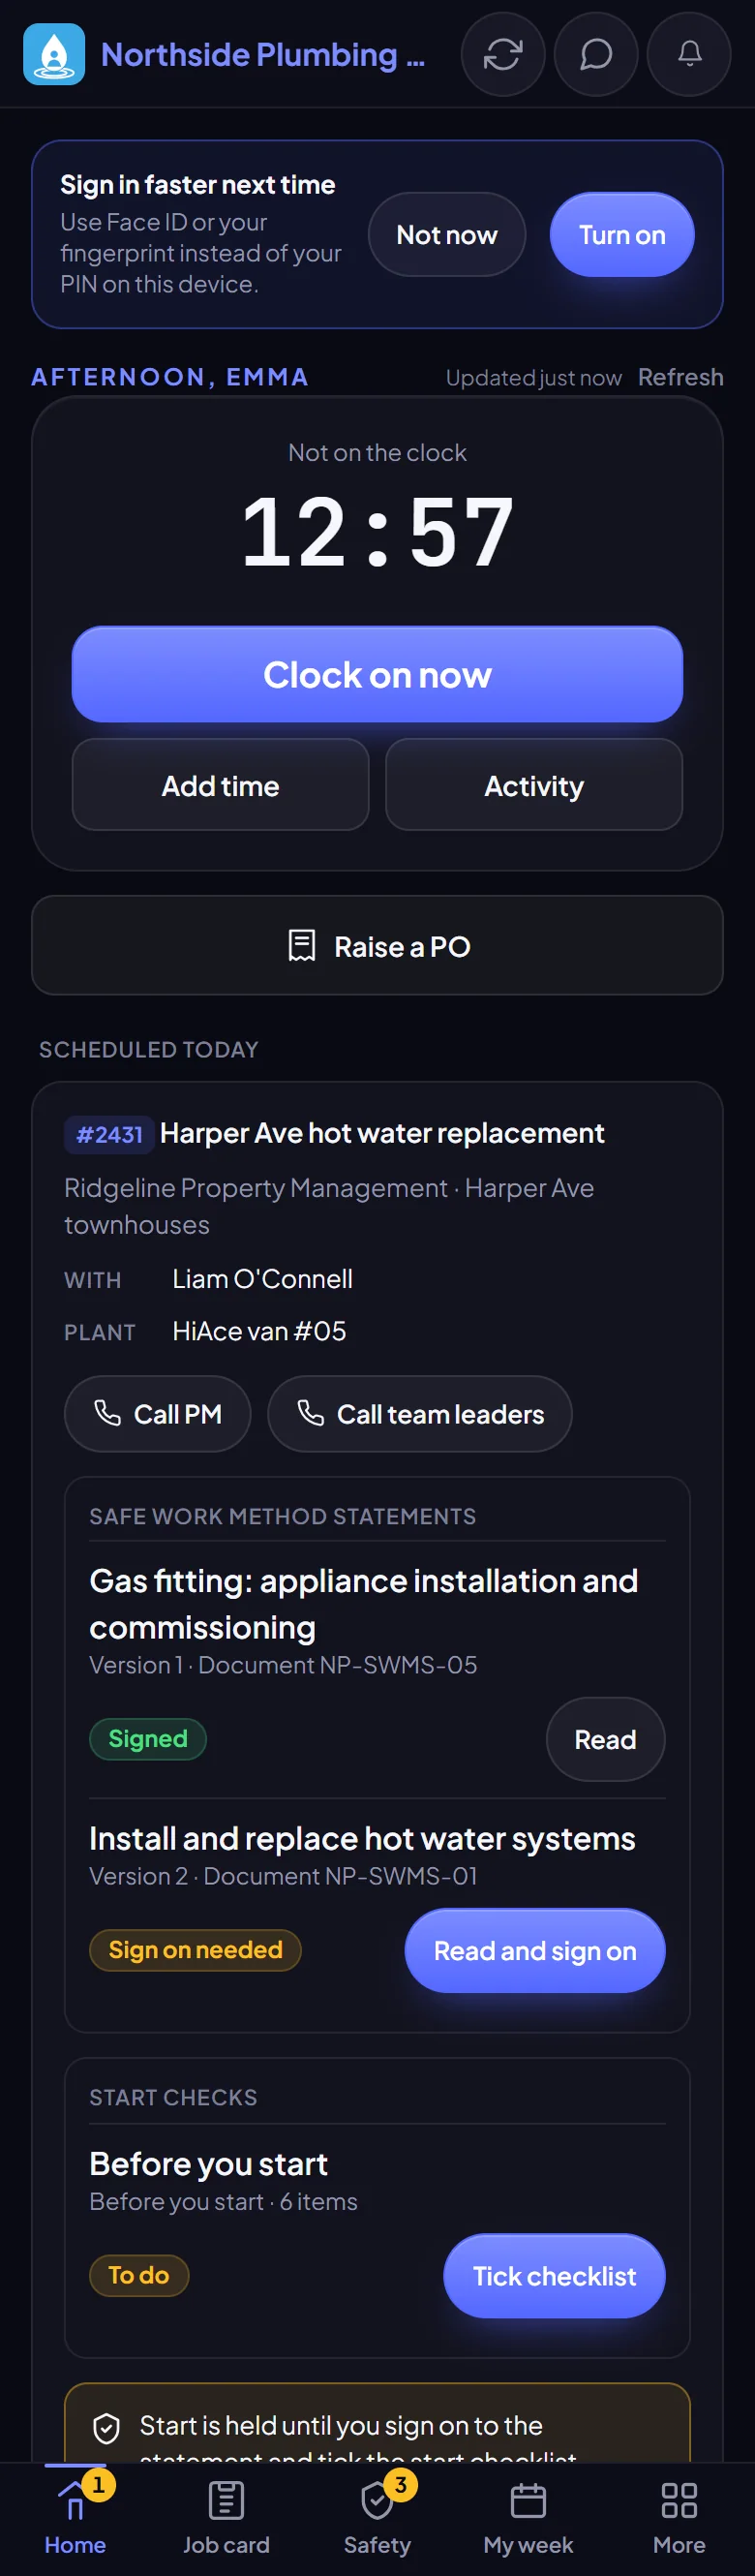
  • On a phone, with or without signal. Home and the Safety tab show the statement under each job that has one, laid out for a small screen. With no signal you can still read it and sign on: the sign-on shows Waiting to send, goes when the signal returns, and the office sees when you typed it.
  • Who is still to sign on. A list shows who is booked on a job with a statement in the next two weeks, on the schedule published to staff, and has not signed the version in force. A day of approved leave does not count, and neither does someone who has been archived.
  • The job’s leader sees it too. The person who leads a job sees the people booked on it who have not signed on, in their to-do list for the next week.
  • A new version asks again. Publish a new version and everyone booked is asked to sign it, while the old sign-ons stay. A button prints the pack: the statement, the job’s details and a line for everyone who has signed.
Good to know

People see statements and sign on when their access level has Job safety: the standard Employee, Mechanic and Manager levels do, and a level set to none sees nothing. The list of who is still to sign works from the schedule published to staff, and jobs are read from simPRO, which is being prepared for customers.

Signing on to a SWMS on a phone: the sentence being agreed to, a name typed, and the Sign on button
Reading a SWMS on a phone: the job’s details first, then the hazards and equipment, then each task
Signing on to a SWMS on a phone: the sentence being agreed to, a name typed, and the Sign on button.

Start and finish checklists

The office writes a short checklist for the start of a job or the finish of one. The crew tick it on the job, and every tick is kept as a record.

  • Written once by the office. List the items in order, mark each one required or not, and say whether it wants a photo. A checklist goes with every job, or only with the jobs you attach it to.
  • Answered on the job. A required item cannot be marked not applicable. An item that is Not OK needs a note saying what is wrong, and an item that asks for a photo needs one when it is OK.
  • What holds Start. On a phone, Start on a job is held until the person has signed on to its statements and ticked its start checklists that day. Clocking off and adding time by hand are never held, because the hours have to be right.
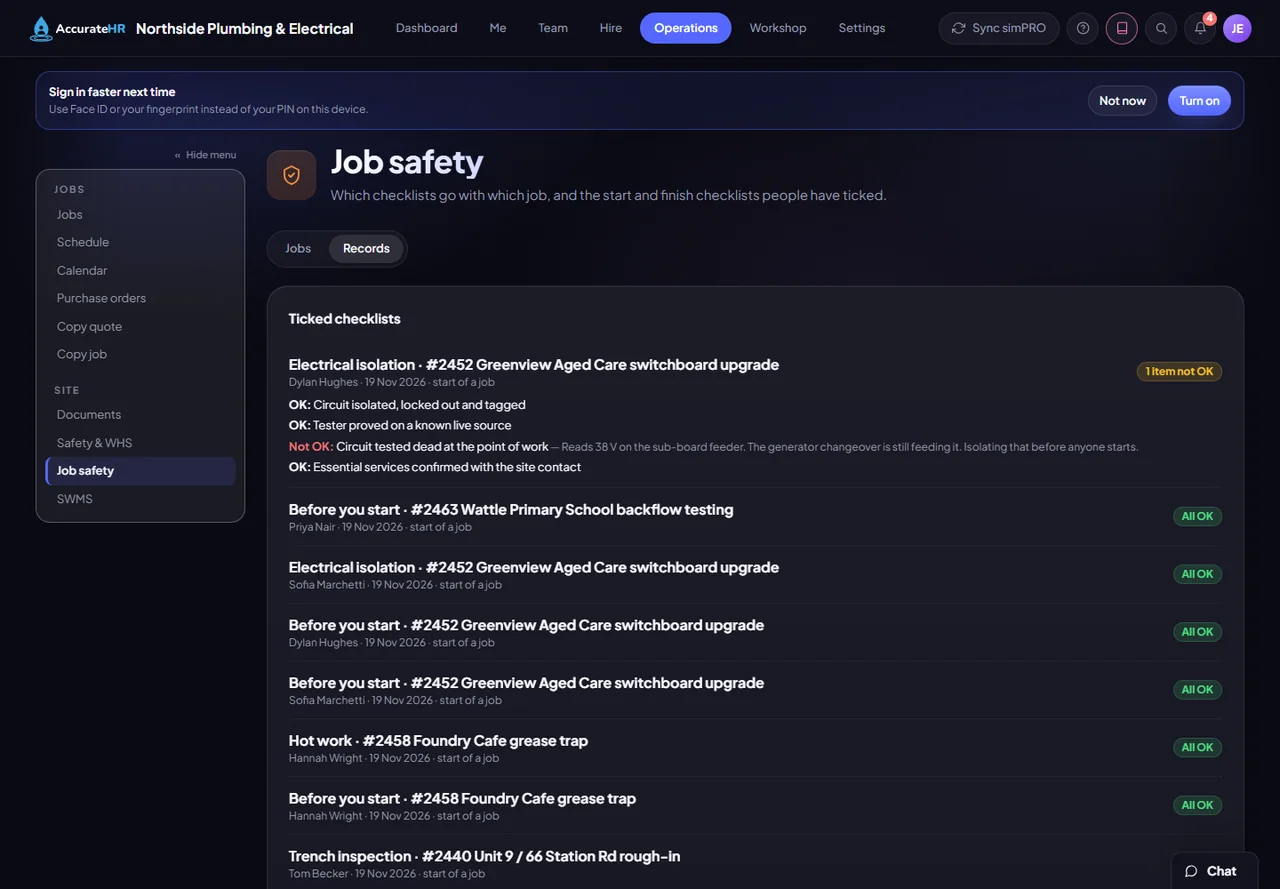
  • Not OK must be put right. A required item that is Not OK is still kept as the record. It holds the person from starting the job until they tick the checklist again with it put right, and it tells the people who lead the job.
  • Asked each day. A checklist counts for the day, so a job that runs for a week asks again each morning. What a person ticks is theirs alone.
  • A record for every tick. Each tick is kept as who, which job, which day and each answer. The record keeps its own copy of the words, so changing a checklist later never changes what was ticked.
Good to know

A checklist can only be attached to a job that has been read from simPRO, which is being prepared for customers. The office writes the checklists under Company setup and attaches them with Can write and attach, which owners and admins hold to start with. A checklist is asked each day: there is no once-per-job setting yet.

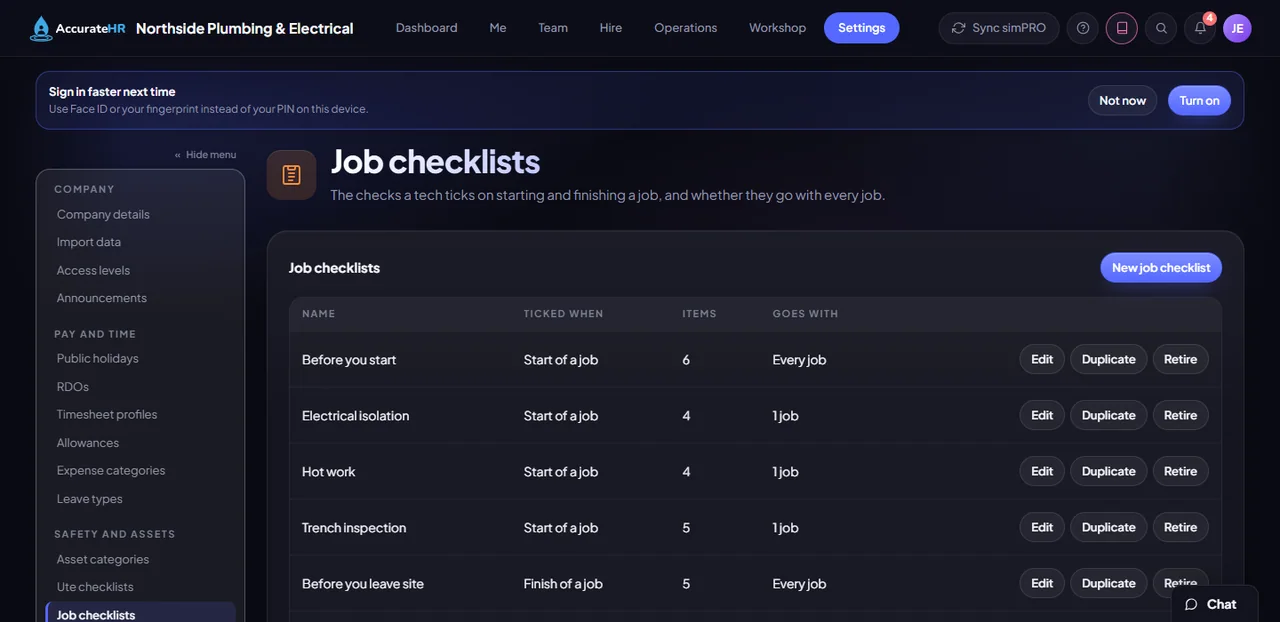
Job checklists: four for the start of a job and two for the finish, and which go with every job
The Field view: Start held until the SWMS is signed on to and the start checklist is ticked
Records of ticked checklists, with one open to show an item that was not OK and the note that goes with it
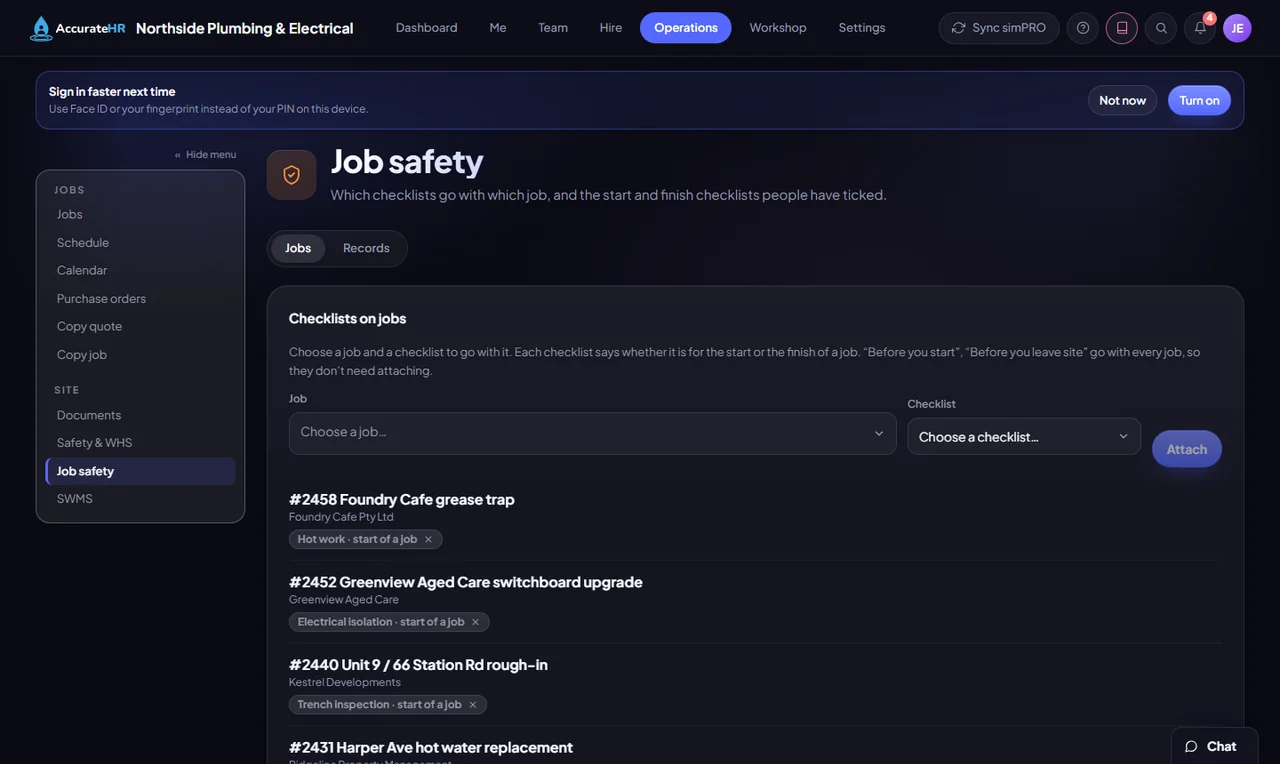
Job safety: the checklists attached to jobs, each for the start or the finish of a job
Job checklists: four for the start of a job and two for the finish, and which go with every job.

Ute checklists and checks

Make a checklist of the tools each kind of ute should carry, check each ute against it, and see what is short on one grid.

  • One checklist for each kind of ute. List the tools a kind of ute should carry, in order, and tick the ones that carry an asset number, such as a laser or a welder. A tool keeps its place when the checklist is edited, so earlier checks still line up with it.
  • Each ute is checked against one. A check is one walk round one ute on a date: every tool is answered Yes, No or N/A, with the asset number for a tool that carries one and a note on a missing one. Every check is kept.
  • From the phone or the workshop. The person who holds the ute can check it from Plant check-out on their phone, or the workshop runs it from Ute checks. A ute is asked for a check when it has never been checked, or not for a month.
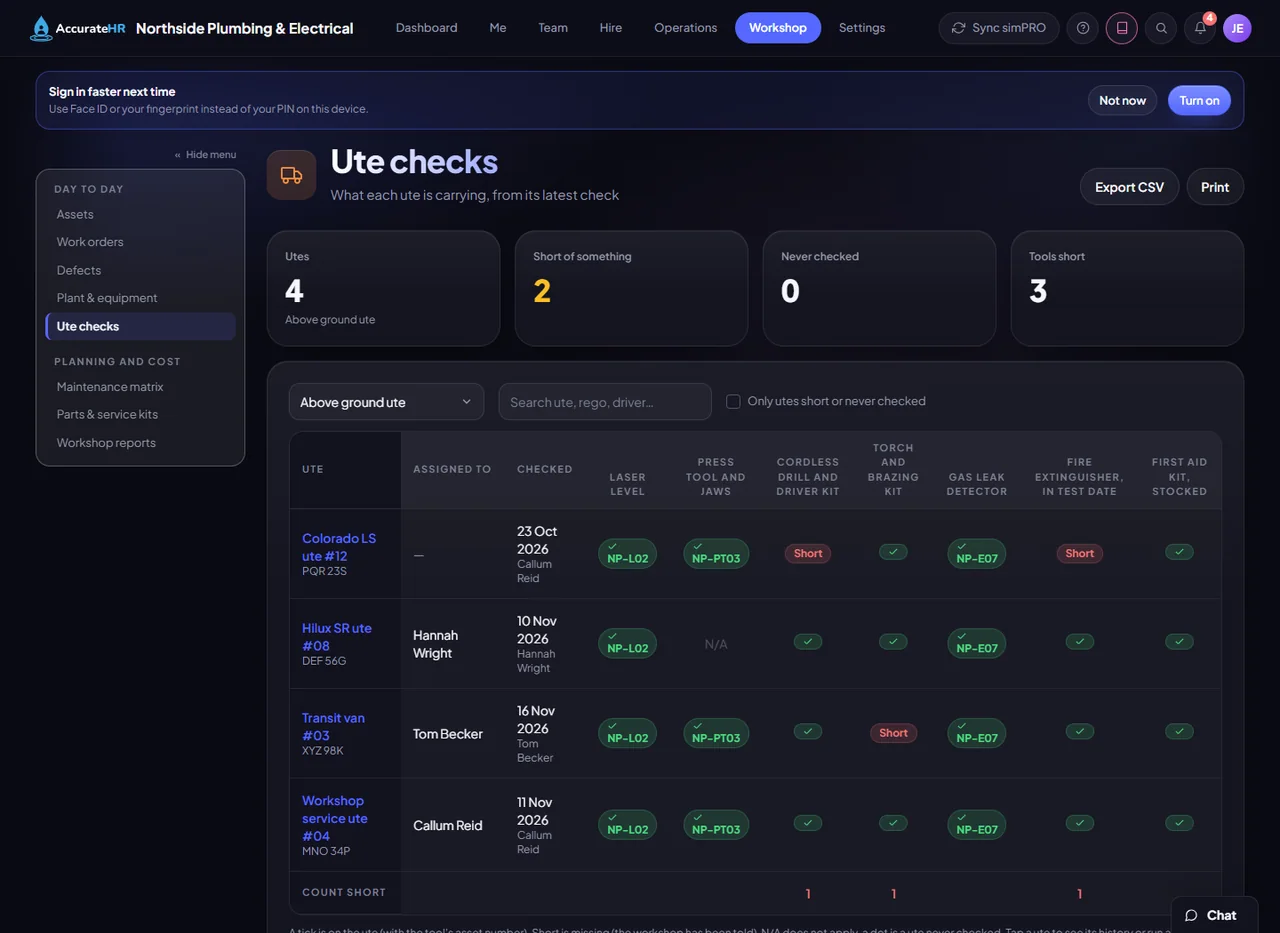
  • One grid for the fleet. Utes run down the side and tools across, each cell from the ute’s latest check: a green tick with the asset number, a red Short pill when a tool is missing, N/A when it does not apply, and a dot for a ute never checked. A Count short row adds up what is missing.
  • Short tells the workshop. A check with anything short sends one notification to admins and mechanics, naming the ute and the tools. The ute stays in service and no defect is raised, because a missing broom is not a fault.
Good to know

The office writes the ute checklists first and gives each ute its checklist. Who can see and check which ute follows access levels: a person checks the ute they hold, and mechanics and admins see the whole fleet. Ute checks are new and still being checked: ask us to show them to you.

Ute checks: each ute’s tools from its latest check, what is short in red, and a count of what is short
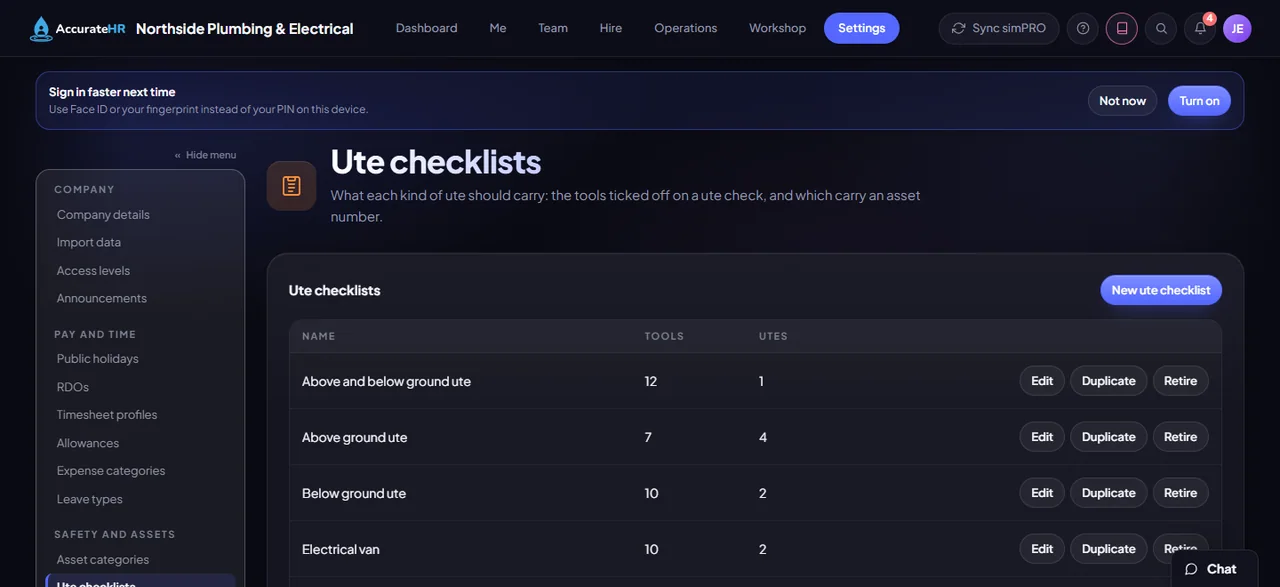
Ute checklists: one for each kind of ute, with how many tools it lists and how many utes use it
Ute checks: each ute’s tools from its latest check, what is short in red, and a count of what is short.
Who uses it

The right view for each person.

Office and admins

Write the statements and checklists, publish versions, put them on jobs and send them to the principal contractor.

People on the tools

Read the job’s statement and sign on, and tick the checks, on a phone with or without signal, and check the ute from the phone.

Leading hands and managers

See who is still to sign on, for their team and the jobs they lead, and who ticked what for their team.

Ready to take the paperwork off your team?

Tell us about your business and we will get you set up with AccurateHR.